|
|
 
| INTERCOOLER and PIPING
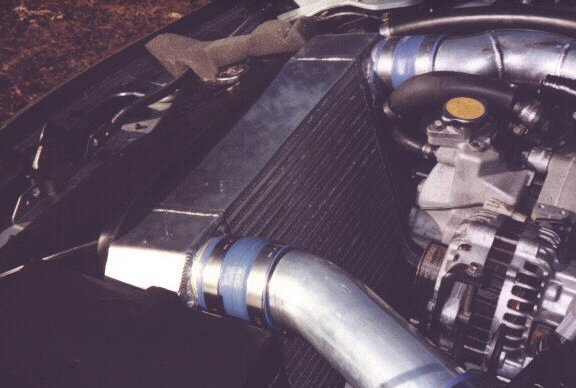
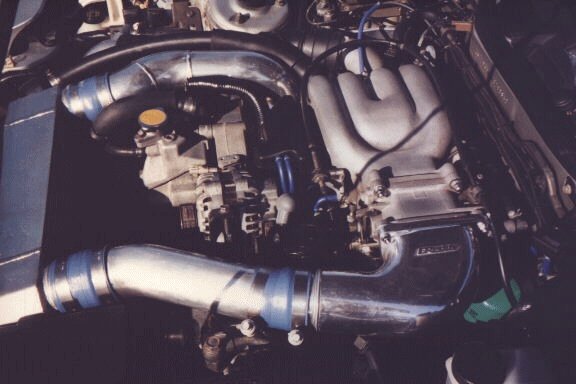
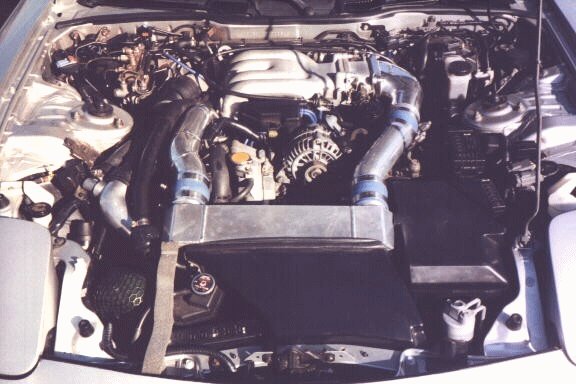
I performed more research before buying my intercooler than any other modification. In theory, an intercooler is responsible for cooling the extremely hot air which comes out of the turbos and into the engine. Cooler air means denser air, which in turn creates more horse power. The intercooler should be as large as possible, but more tall than long to minimize pressure drop. It should have an unlimited access to ambient air to keep intake temperatures as close to ambient as possible. The intercooler piping should be large in diameter with minimal bends to increase air flow efficiency. I found just about all of these features in the ASP's medium stock mount intercooler. This isn't the largest engine mount intercooler available, but it is the largest available without relocating the battery. In my opinion and based on some fact, the ASP medium intercooler is simply the best available for the street driven car! The core and piping provide the least amount of pressure drop for instantaneous throttle response. I've yet to heat soak this intercooler even though the opening in the air duct provided looks rather small, and I drive the car very hard. When I'm finished driving the car, the outlet end tank is always cool to the touch. The quality and aesthetics of the intercooler and air duct is remarkable, and the install is a snap. As for the price, it would be extremely difficult to reproduce it yourself for what it costs to but one ready to install. In the beginning, I carefully considered a front mount intercooler. Front mount intercoolers are located in the opening in the front end of the car. Although the is a good source for ambient air, it partially blocks the airflow to the radiator. Because of the fact that this car has a marginal cooling system from the factory, it didn't seem feasible to compound this problem. Front mount intercoolers are also generally longer in size and require a few more feet of piping to get from the turbos and back to the engine. This longer core as well as more piping create added pressure drop and increased turbo lag. This pressure drop makes the turbos work harder to create the same amount of boost. Turbo lag is the time it takes the turbos to spool up and actually boost the engine. With all of these factors as well as a very time consuming install with the front mount, the decision was rather easy.
Approximate Performance Gain: Intercooler - 15 HP IC piping - very minimal HP gain (not measurable)
Stock AST Aluminum AST
Water Sprayer Installation In an attempt to gain a little extra HP at the track I installed a water sprayer system for my intercooler. The system is activated by a manual switch in the center console. The whole idea of the sprayer is too prevent heat soak of the IC while doing a burnout and sitting on the line waiting for the green light at the dragstrip. The system was very easy to construct and consisted of the following items: 1. vacuum line rated at 40PSI or greater (Home Depot) 2. universal washer fluid pump (auto parts store) 3. aquarium check valve (pet shop) 4. sprayer nozzles (McMaster) 5. barbed fitting, used to connect two hoses together (auto parts store) 6. brass terminal block (one inlet and one outlet needed - plumbing store) 7. teflon tape, drill and bits (Home Depot)
Here's how I did it: First I needed to find a mounting location for the washer pump. Since it is relatively small this wasn't a problem. I mounted mine on the driver's side of the battery box with two screws. Then I drilled a hole in the neck of my washer fluid tank just big enough to push the barbed fitting through. On the inside of the washer tank I pushed a piece of vacuum line down to the bottom of the tank and connected it to one end of the barbed fitting. On the other end I connected another vacuum line and ran it to the inlet of the pump. I took another piece of vacuum line and ran it from the outlet of the pump to the front of the IC duct. I drilled a whole in the duct just big enough for the sprayer nozzle to squeeze through. I screwed a barbed fitting at one end of the terminal block and connected the vacuum hose coming from the outlet of the pump. Then I plugged the second opening of the terminal block, since my terminal block has 3 openings. The nozzle was pushed into the IC duct from the inside of the duct and screwed it into the terminal block which sits outside of the IC duct. I used teflon tape on all the brass fittings. The pump was wired to a switch on the center console to be operated manually by the driver. Hopefully you can follow what I've just said by looking through the pictures below. More detailed pics of the installation are on the way! IC Sprayer
|